
I’ve been fiddling with a brand new unlocked Nexus S smartphone lately. Yes, I know it’s a couple years old and yes, I too wonder how I was able to get a new one! As a result of this recent quest for the newest possible android version, I learned a few things about how to do android updates. In the past few days I did about 4 different updates to bring my Nexus S android up to version 4.1.2 which is the last available android software update for that smartphone. Sad, but a two year old phone really is much much older than two years when you look at what it has in features compared to today. It kind of makes you realize why the companies are updating their smartphones every year.
The reality is that I needed to manually update the device all the way back from version 2.3 Android Gingerbread. There were no over the air updates in my journey! Manual updates require some tinkering which can be a bit stressful. As I went through the process of multiple updates I did eventually discover a software tool which makes manual android updates virtually automatic. More on that later.
An advantage I had was that the Nexus S smartphone was new. The reason I mention this is because some methods will result in all the information being erased. The great thing about android though is it’s easy to make backups and restore backups. Have no fear, I’ll tell you in this guide when you need to backup your information and which methods/steps will erase your information/settings.
There is no need to fear your technology. Depending on how far you need to go in this guide, you might be pleasantly surprised just how easy is to get the latest android os update. I will give you fair warning when we get into slightly more technical methods which are more risky for your device. Certainly when you’re fiddling with the engine of a car you can mess things up. That said, the reason I’m writing the guide is because it’s the easiest method out there for manually updating your android based Nexus device if you get to that point.
Note: I’m not guiding you on how to root or change your device from that perspective. All methods I discuss are for keeping your android device in the default and official state. Many guides you will find are technical and difficult to follow. In addition, many guides install things on your device which aren’t “stock”. If you own a pristine Google Nexus device, I will help you keep it that way. A lot of other guides are unclear about what exactly you’re going to end up with after the updating takes place.
Method 1: Force an Over The Air (OTA) Android Update
In a perfect world, you wake up one day and notice that there is an update available for your smartphone or tablet device. I own a Samsung Galaxy 3 and the check for updates method did its thing. No fuss, no muss. The best think about OTA updates is that word spreads fast. If there is a new android update being rolled out to devices tech blogs and website blast the news EVERYWHERE. It’s one of the highlights of any geeks life, being able to announce a new android version being released. Do you get juiced?
I would have to say the number one reason for getting a Google Nexus device is simply because they get the android updates first and they get them often. When you are running a stock or default android version, updates can easily be pushed onto the device. If you own a non Google device running Android you may not get these OTA updates at all. Android needs to be tweaked in order to run on other devices where the company has added their own flavor to the operating system and thus, it’s not actually a stock version of Android. Essentially the modifications and tweaks on many non official Google devices complicate the android os because it’s simply not stock. Thus, you wait and hope for an update whereas all the Google Nexus owners are celebrating with their new versions of the OS. So if you don’t own a Google device, you may hear about an Android update but it’s not ready or may never be available for your device.
Note: OTA (over the air) updates are not going to risk your data/settings/app/information. All is safe.
Method 1a:
- Go to Settings > About Phone (at the bottom of the list) > System Update
Method 1b:
If Method 1a isn’t successful, try this method 1b. This is an attempt to force the OTA update. Your results will vary. Expect this not to work and you will save yourself some disappointment. Give a few tries though before giving up.
- Connect your charger and plug in your device
- Go into airplane mode
- Under settings-> apps-> all (scroll the page to the left)
- select ‘Google Services Framework’
- press “force stop” then press “delete data”
- Enable wifi only (don’t leave airplane mode)
- Settings->about->system updates->check for update.
Repeat this several times if it doesn’t work at first. There is no need to remove the sim card or reboot.
A few tips that I’ve learned about forcing OTA updates. Understand that theses are hit and miss. Some people in comment sections claim they have worked, others claim no such luck. The point is they are all worth considering if you are unable to get that OTA android update. Here is a collection of tips:
- try plugging in your device first
- if at first you don’t succeed, try again, then try again, then try again…
- try removing your sim card and going through the steps again
- dial this on your phone and press send: *#*#CHECKIN#*#* or you can try instead: *#*#2432546#*#*
- try rebooting your device
Method 1c:
- Be patient! Simply wait a few days or weeks before moving forward on anything more major. If your android device is working nicely today, it’s never a bad idea to just wait it out. Over the air updates can be a frustrating experience if you’re impatient.
- While you’re waiting, check various website to see the status of OTA updates. As I mentioned earlier, technology blogs and websites drool at the thought of android updates so fear not, they will have the latest information. Check your smartphone providers website also to see what’s going on.
Method 2: Android Update via Manual Procedure
Note: You need to first figure out your device model number (example: Nexus S i9050a). Just knowing it’s a Nexus S is not detailed enough. You need the “Android version”, and “Build number” which can be found under Settings > About “Device” (found at the bottom of the settings list. Find that information before proceeding and write it down.
At this point, you should have exhausted your patience waiting for an over the air update. It never came and you’re juiced to get the newest possible Android build onto your device. I’ve been at this point myself and I know the feeling!
First, please do BACKUP your information. This is mandatory. A factory reset is when your device wipes all data and information and replaces it with a fresh clean install with all the default settings.
Next:
- Ensure that your account’s information are backed up on Google’s server and that all the account have been synchronized on Google’s server.
- You will have to parameter again all your applications : social networks account (sign in into Twitter, Facebook, or whatever account you use), cloud service account (sign in into Ubuntu One, Dropbox, Evergreen, or other service accounts you ultilize), library account (sign in into Kindle or other service accounts you utilize). Simply said, ensure you have all those account sign-in information with you.
Regardless if I say manual updates are risky or not, it’s a great time to backup your device. I could write an entire article about how to back up an Android device, but I won’t do that here. What I will suggest, because I’m lazy when it comes to backing up devices, is to consider “My Backup Pro” from the Google Play store. Ah, is it free you ask? No, it’s not. That said, isn’t $5 worth piece of mind in having ALL your stuff backed up? I think it is. Think about how much important information and settings you have or will have on your android device. Spending $5 is nothing in comparison to losing that data. We can pay hundreds of dollars each year for insurance we never need so why not spend a tiny amount on this type of data insurance? Okay, enough lecturing.
Disclaimer: I must make clear that following any of these next steps has an element of risk. Voiding a warranty or locking up aka bricking your device is possible. When you are talking about replacing an operating system, it’s a substantial procedure. In fact, what’s more major than swapping out the guts and brains of a computer? I’m telling you now there is an element of risk and it’s not worth updating an operating system if your fear outweighs your desire for new or better features. In the world of computer graphic cards, there is a saying that if your graphic card drivers aren’t causing issues, it’s worth considering leaving it as is. Right now you have a working device and please consider whether the risk is worth the reward. Think before moving forward. I was willing to take these risks so I wouldn’t be writing this tutorial if I felt the risk was extreme on breaking your device permanently. At the same time I need to inform you that there is some risk.
About Non Google Nexus Device Manual Android Update
If you haven’t concluded by now, let me repeat that the whole “android update” world is a confusing one. You may have a device that has android, but you will not have the same flexibility for manual updates as the Nexus device owners. The key is that non Nexus devices are considered “android-based”. If you own a Samsung device, you will be happy to know that they have a software program named Kies that checks your device and can manually update your version of android. If not Samsung, it pretty much means over-the-air or OTA updates are about your only option. If you’re wanting to keep your device default, you’re tied to the manufacturers ability to update their modified version of the Android software. It’s complicated for them because they have to meet standard and beyond that, there are the different mobile carriers which have certain settings that are required. If you must get the latest android on your “android-based” device and can’t or are unable to wait for an OTA update, you can opt for non official updates which I won’t cover here. There is a massive community devoted to bringing modified and different versions of android to a variety of devices. These are non official and non default and frankly I’m not interested in that. You do have options outside of official releases and ultimately it’s up to you whether it’s worth going down that road.
Manual Update Procedure For Nexus Devices
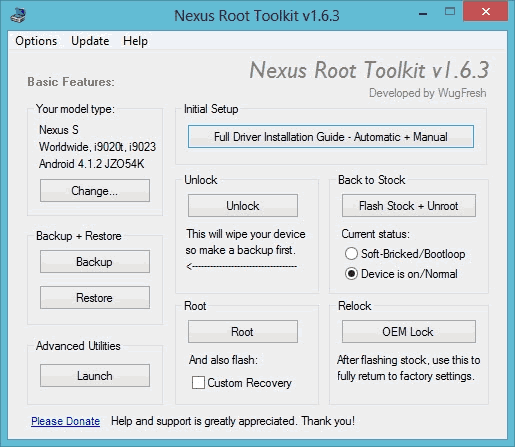
Goodie! We’re finally up to the place where the real work begins. Well, not really work because this procedure is made simple because of a very user-friendly tool named Nexus Root Toolkit by WugFresh. It’s Windows software just so you know.
- Backup your entire device! If you’re not sure how, go back and read my blurb. If you can’t backup your information, DO NOT PROCEED.
- Accept the risks involved in a manual update. If you’re not sure about whether it’s worth bricking your device, DO NOT PROCEED.
- Download and install the Nexus Root Toolkit here.
- Fully charge your Nexus device.
- Run Nexus Root Toolkit.
- Follow prompts and choose your device and build.
- NOTE: The Nexus Root Toolkit has incredibly clear instructions and help. Read what the program tells you and you will be fine!
- Once the program opens, click on the button “Full Driver Installation Guide” under “Initial Setup”.
- This part of setting up your update is going to be the most tedious. It’s not difficult and I don’t think you will find the process to be very well and clearly explained. The initial setup is key because your device needs to connect properly to your PC. You don’t want to skip this part and you must pass this setup before moving forward.
- The next step is where you will be losing your data and settings. Backup your entire device! If you’re not sure how, go back and read my blurb. If you can’t backup your information, DO NOT PROCEED.
- Click the “Unlock” button under the “Unlock”. Do not fear this step. If you were to skip to the “Back to Stock” procedure, the Toolkit will advise you that the device needs to be in an unlocked state BEFORE you’re able to update. Follow this procedure and the Toolkit will guide you. Everything is clearly explained so just follow along.
- During the unlocking, don’t fear the reboot as it takes time. I was getting anxious, but it does get past the load screen eventually. From there you need to skip quickly through the setup as if your device has been booted for the first time. Once there, you need to again put the phone in USB Debug mode. Once done that, you’re ready for the next step.
- Here is where we are going to put a brand spanking new default factory image on your device. Click the button “Flash Stock + Unroot” under the “Back to Stock” section.
- The Nexus Root Toolkit will help you select what version of Android you want and it will download it for you. Again, these are official Android images from Google and will put your device into a factory default state.
- Once you’ve chosen and downloaded the factory image, the Nexus Root Toolkit will do its thing. It won’t take long for the process to complete and there you go. A fresh and updated version of Android on your device. Just one last step.
- Since you unlocked the device, you need to relock it. You will need to click on the OEM Lock button under the “Relock” section of the Toolkit.
- Once booted back up and you’ve gone through the initial setup, restore your backed up information.
- Now you’re done!
Check back as I’m putting this tutorial/guide together in the next day or two..
i have videocon a22 with android 2.3.7 and my mob says low space in to internal memory after geting updates of all apps intalled in it (ex. watsapp, youtube, maps etc.) plz tell me wat do i do? plz
Thank you
Prasad